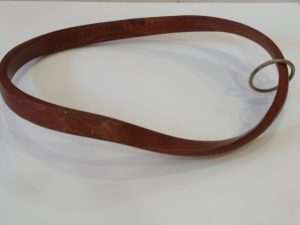
Mobius Strip
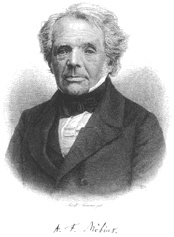
The Mobius strip is named after the German Mathematician and theoretical astronomer August Ferdinand Mobius (1790-1868).
What to do
- Place you finger on the wider face of the strip.
- Lightly follow a path all the way around the strip without lighting your finger (with the exception of where it is hanging).
IS THERE ANY PORTION OF THE STRIP YOU DID NOT TOUCH?
Answer: NO!
Your finger has traced a path all the way around twice to get back to where you started. The Mobius strip only has one side!
The surface is formed by taking a flat rectangular strip, twisting one end 180 degrees and attaching it to the other end. This surface only has one side, whereas other surfaces like a loop or a polyhedron have two sides (front and back).
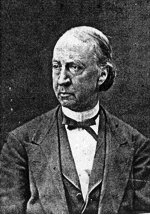
The study of the mathematics of surfaces is called topology. It was so named by Johann Benedict Listing (1808-1882), a German mathematician who independently discovered the properties of this surface at the same time as August Mobius.
Mobius StripTake Home Experiment!
You will need tape, something to write with, and scissors (with an adult’s help if necessary).
Directions:
First, we’ll make just a paper loop.
- Cut along the right-most dotted line to get ONE of the two strips along the edge of this paper.
- Make a loop with the paper by lining up the two short ends (C above A and D above B, all facing up).
- Secure the ends together with tape. (Scotch tape works best.)
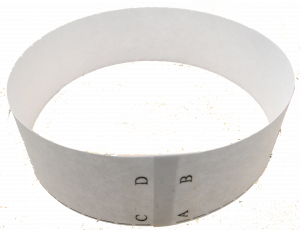
Now, we’ll make a mobius strip.
- Repeat steps 1 & 2
- While holding the two short ends of the paper, twist once so that one set of letters is facing down. (C will be on B and D will be on A now.)
- Secure the ends together with tape. (Scotch tape works best.)
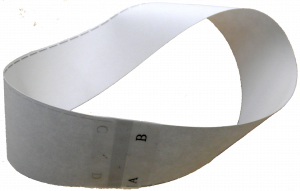
You have your own mobius strip!
Time for the experiments!
Activity 1:
What do you think is going to happen if you draw a line around the loop? What about if you draw one around the mobius strip?
- Now, draw a line along the middle of the loop without picking up your pencil. Continue all the way around.
- Repeat the previous step with the mobius strip (You may need to twist the strip as you go along.)
Where did you end up in each case? Is there any portion of the paper that you did not draw a line on?
You end up back where you started for both the loop and the mobius strip. With the loop, your line never reached the inside of the loop. With the mobius strip, you never had to turn the paper over to the back, but your line follows all the way around the paper.
Mobius strips only have one side, unlike the loop that has two!
Activity 2:
Is in the pdf file above.